Bit by bit I'm getting closer to being able to apply the final top coat and get this thing the right way up so I can start with some wood working again.
I have applied a coat of high fill putty primer to ensure all low spots are filled and are currently in the process of sanding in preparation for primer then top coat.
I'm having issues uploading pics so have added a link to share
Saturday 23 May 2015
Wednesday 7 January 2015
Reverse Bucket set up
Whilst beginning to assemble the rear Jet housing I thought it would be neat if I could some how add a reverse mechanism to the boat, this would have to be worked out prior to Epoxying the HD foam in place for additional tapping plates may have to be added. I purchased a Kawasaki reverse bucket off EBay and now have to work out how and where I'm going to mount this thing.
What makes matters worse is that I have trimmed a good 100mm or so off the rear of the Jetski hull to allow the jet to sit further out with the hope it will improve handling but has reduced the area to fit the bucket onto:-(
After my purchase had arrived I cut 2 pieces of Aluminium with a hole drilled in the end, clamped them to the jet housing and used these as temporary bracket so I could get some sort of idea as to where the bucket would be mounted.


Being indecisive as to how far off the back of the jet nozzle the bucket should be, I plan to cut a few different sets of brackets so that once the boat is complete and the bucket is positioned too close or too high I will be able to simply swap the part over.
I drew up a design that I was happy with and cut them out on a CNC router.

What makes matters worse is that I have trimmed a good 100mm or so off the rear of the Jetski hull to allow the jet to sit further out with the hope it will improve handling but has reduced the area to fit the bucket onto:-(
After my purchase had arrived I cut 2 pieces of Aluminium with a hole drilled in the end, clamped them to the jet housing and used these as temporary bracket so I could get some sort of idea as to where the bucket would be mounted.
Being indecisive as to how far off the back of the jet nozzle the bucket should be, I plan to cut a few different sets of brackets so that once the boat is complete and the bucket is positioned too close or too high I will be able to simply swap the part over.
I drew up a design that I was happy with and cut them out on a CNC router.
 |
| First bracket well under size |
 |
| Recut bracket just a little bigger |
Wednesday 26 November 2014
Hull near completion
After almost a good 12 months off due to home renovations, I've managed to clean up the little space I have around the boat and continue building.
Taking off from where I left it, the hull had been sanded fair and paint purchased with my next step beginning to apply primer, but, after I noticed I had sanded through to glass fibre in a few small spots where the joining tape had been laid, I thought it was best I roll on a few more coats of Epoxy to ensure the base is thick enough.
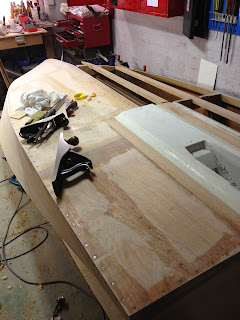
While sanding back the hull, to break the monotony I have started finishing off the back of the Jet pump cover that hangs out past the Transom. HD foam has been used to fill the sides and top, I have profiled the foam so that it matched the shape of the inside, it will then be Epoxied and glassed into place in the coming days.
Taking off from where I left it, the hull had been sanded fair and paint purchased with my next step beginning to apply primer, but, after I noticed I had sanded through to glass fibre in a few small spots where the joining tape had been laid, I thought it was best I roll on a few more coats of Epoxy to ensure the base is thick enough.
While sanding back the hull, to break the monotony I have started finishing off the back of the Jet pump cover that hangs out past the Transom. HD foam has been used to fill the sides and top, I have profiled the foam so that it matched the shape of the inside, it will then be Epoxied and glassed into place in the coming days.
 |
| Jet pump cover |
 |
| Profiled HD Foam |
Monday 2 December 2013
Flipping the Hull
Prior to painting I needed to flip the hull to trim down the edges and also test fit the Exhaust I had recently purchased.

I had a problem with the stock Exhaust being to long hitting into the transom and with it being fixed to the manifold I was unable to turn it to one side, then after looking around for different options I discovered Coffman Exhaust Systems made performance exhaust kits for the TS model, they came with a silicon coupling which would enable it to be moved into the back corner. So after keeping a constant look out on Ebay I managed to pick myself up a brand new kit which some guy in the US had sitting around for the last 20yrs gathering dust.


Thank god it actually fits!

Friday 29 November 2013
Sanding
Over the last week I must have put in at least 10hrs of sanding, filling then sanding then filling :-( but is almost at the stage where I can start applying the Primer. I have chosen to go with International Marine paints 'InterProtect' 2pak Epoxy primer.


 |
| Sanding in progress
|
Monday 11 November 2013
Jet ski Transition hull mod
Because the ski hull sat lower and had a different profile than the Squirt hull I epoxied a piece of High Density foam to the hull and shaped it so that it gradually merged into the Squirt.

Once the Epoxy had dried I sanded it down to follow the contours of the Squirt.
600 csm was then used to glass the foam into the hull.
 To finish and to assist with sanding I smoothed over a piece of peel ply, it was a little tricky trying to remove all the air bubbles but I think it will work well.

 |
| Cut HD Foam |
 |
| Fiberglass and Epoxy the foam in place |

Once the Epoxy had dried I sanded it down to follow the contours of the Squirt.
600 csm was then used to glass the foam into the hull.

Thursday 7 November 2013
Completed Hull
With the skinning of the hull now complete I am currently in the process of filling all the screw holes and small imperfections with Epoxy filler made from epoxy and Q-cel. I figure if I fill a little each day I should almost be ready to start glassing the joins this weekend.


Wednesday 30 October 2013
Skinning
After taking a month off I've picked up the tools again and started by making some templates up to transfer onto the plywood.


Although the template is to size, I cut the plywood over size by 10mm along the chine and ensured I had a straight edge forward of frame#2, the ply was dry fitted numerous times with a little fairing needed here and there ensuring it was a neat fit.
 All holes are pre-drilled and counter sunk, I also gave the inside of the panel a coat of Epoxy prior to fitting.
 Taking about 1hr20min to fit 1 side (by myself) and with the resin curing, I found it a lot easier on the other side if I pre-screwed the screws in the holes before applying the epoxy, this saved me a good 30min
 The bottom side has been cut down to 10mm over and I now have to cut out a section for the JSki hull and try and get a flat, even transition


Although the template is to size, I cut the plywood over size by 10mm along the chine and ensured I had a straight edge forward of frame#2, the ply was dry fitted numerous times with a little fairing needed here and there ensuring it was a neat fit.


Friday 18 October 2013
Bending and Fairing
With my wife working back late quite a bit over the last few weeks it has given me a considerable amount of time to working on my little project.
Sheers and Chines
After breaking a sheer while bending it in to place I soon learnt my little kettle steamer is no good for anything requiring more than 20-30min of steam so I found myself a piece of 80mm down pipe, plugged an end up, filled it with boiling water and soaked the 2 sheers for about 48hrs. They were then remove, clamped to the breast hook, bent into place and left to dry while we went away for 3 days.
Upon my return they were un-clamped, epoxied and screwed into place.


 |
| Soaking Pipe |
I must admit I was quite surprised at how easy it was to bend the sheers, the chines on the other hand were a different story. Due to the large amount of twist I decided to put in the chine, it made them quite difficult to hold in place while the epoxy cured, so I thought I should add a chine blocking member to the stem to give me a bigger surface to adhere to, weather it helped or not I'll never know.
After I had started to fair the chines back I soon discovered that I had mounted them to far back (5mm), so I laminated an additional 8mm piece on and faired in back, it actually worked out really well.

Joining
While I was in the process of fairing I thought I should start to look at how I will go about joining the plywood and which method I would use, butt or Scarf?
In the end decided on Scarfing the joint and made myself a few jigs that would help me achieve a nice strong and flat join.
I found a scrap piece of 28mm Armor Ply and made up a press that would hopefully keep the joint as even as possible across the width, keep the board straight along the length and fill in any voids where I over sanded/planned. Of course it all had to be covered in wax paper and clear packing tape to prevent the resin from sticking, I then clamped it all together once the epoxy was applied.
Scarf Joint fresh from the jig
|
All that was needed was a quick sand and I have a perfectly flat even scarf join, I couldn't be happier with the result and that's another easy job completed which I thought would be a challenge
Wednesday 29 May 2013
Jet Ski Hull Mods and install
As I have removed a section of the battens to make room for the ski hull aft of frame #1, I have added additional stringers by profiling them to fit the shape of the ski hull, these will be bolted to the transom and frame #1 in place of the removed battens.

Having some spare time while the epoxy dried I thought I would make myself a steamer using an old kettle I had laying around. I bolted a hose fitting to the lid then used Silicon to seal the lid and spout. After a trial run it seems to work quite well getting over 30min of steam from a full pot. Might have to rig up a easier way of filling it though.
 |
| Modified Kettle |
 |
| DIY Wood steamer |


Subscribe to:
Posts (Atom)